自定义 GMT 的 Logo
文章目录
这篇博文想干什么?
GMT 中使用 -U 选项可以给图加一个时间戳,如下图左图所示。
这篇博文的目的就是把左边的时间戳变成右边的时间戳。黑底白字的部分,我称之为 Logo。

当初想要自定义 logo,是因为看到了 Hi-net 首页的地图中有自定义 logo 为 Hi-net NIED 觉得挺有意思,对于某些机构来说,加上一个个性化的 logo 应该也算是一种需求。
理解原理
本文的内容基于 GMT5.1.0。写完本文之后,我因为没有自定义 logo 的需求了,所以本文在一段时间内应该不会再更新。不过本文介绍的方法应该可以很容易应用到更新版的 GMT5 以及之前的 GMT4 中。
gmt_timestamp
函数定义
以下代码来自于 GMT-5.1.0/src/gmt_plot.c :
void gmt_timestamp (struct GMT_CTRL *GMT, struct PSL_CTRL *PSL, double x, double y, unsigned int justify, char *U_label)
{
    /* x, y = location of the time stamp box
    * justify indicates the corner of the box that (x,y) refers to, see below
    * U_label = label to be plotted to the right of the box
    *
    *   9        10       11
    *   |------------------|
    *   5         6        7
    *   |------------------|
    *   1         2        3
    */

    time_t right_now;
    char label[GMT_LEN256] = {""}, text[GMT_LEN256] = {""};
    double dim[3] = {0.365, 0.15, 0.032};   /* Predefined dimensions in inches */
    double unset_rgb[4] = {-1.0, -1.0, -1.0, 0.0};

    /* Plot time string in format defined by format_time_stamp */

    right_now = time ((time_t *)0);
    strftime (text, sizeof(text), GMT->current.setting.format_time_stamp, localtime (&right_now));
    sprintf (label,"  %s  ", text);

    PSL_command (PSL,"%% Begin GMT time-stamp\nV\n");
    PSL_setorigin (PSL, x, y, 0.0, PSL_FWD);
    PSL_setlinewidth (PSL, 0.25);
    PSL_setfont (PSL, GMT->current.setting.font_logo.id);
    PSL_defunits (PSL,"PSL_g_w", dim[0]);  /* Size of the black [GMT] box */
    PSL_defunits (PSL,"PSL_g_h", dim[1]);
    PSL_deftextdim (PSL,"PSL_b", 8.0, label);  /* Size of the white [timestamp] box (use only length) */

    /* When justification is not BL (justify == 1), add some PostScript code to move to the
    location where the lower left corner of the time stamp box is to be drawn */

    switch ((justify + 3) % 4) {
        case 1: /* Center */
            PSL_command (PSL,"PSL_g_w PSL_b_w add 2 div neg 0 T\n"); break;
        case 2: /* Right justify */
            PSL_command (PSL,"PSL_g_w PSL_b_w add neg 0 T\n"); break;
    }
    switch (justify / 4) {
        case 1: /* Middle */
            PSL_command (PSL,"0 PSL_g_h 2 div neg T\n"); break;
        case 2: /* Top justify */
            PSL_command (PSL,"0 PSL_g_h neg T\n"); break;
    }

    /* Now draw black box with GMT logo, and white box with time stamp */

    PSL_setfill (PSL, GMT->current.setting.map_default_pen.rgb, true);
    PSL_plotsymbol (PSL, 0.5*dim[0], 0.5*dim[1], dim, PSL_RECT);
    PSL_plotcolorimage (PSL, 0.0, 0.0, dim[0], dim[1], PSL_BL, GMT_glyph, 220, 90, 1);
    PSL_setfill (PSL, GMT->PSL->init.page_rgb, true);
    PSL_command (PSL,"PSL_g_h PSL_b_w PSL_g_w 0 Sb\n");
    PSL_plottext (PSL, dim[0], dim[2], 8.0, label, 0.0, 1, 0);

    /* Optionally, add additional label to the right of the box */

    if (U_label && U_label[0]) {
        sprintf (label,"   %s", U_label);
        PSL_plottext (PSL, 0.0, 0.0, -7.0, label, 0.0, 1, 0);
    }

    PSL_command (PSL,"U\n%% End GMT time-stamp\n");

    /* Reset fill style to empty and no outline and reset linewidth */
    PSL_setfill (PSL, unset_rgb, false);
    PSL->current.linewidth = -1.0;
}
源码说明
- L16:定义数组 dim,其中
dim[0]代表时间戳黑色部分的宽度,dim[1]代表黑色部分的高度,dim[2]没有用;其单位为英寸; - L25:开始向 PS 文件中写入代码;
- L26-L31:一些设置;
- L51:设置填充色为黑色;
- L52:绘制矩形;
- L53:将
GMT_glyph写入矩形中;这个是重点! - L54-L56:写入时间;
- L60-L63:写入 command 或者 label;
- L65:结束;
GMT_glyph
GMT_glyph 的定义位于 gmt_plot.c 中:
/* Get bitmapped 600 dpi GMT glyph for timestamp.  The glyph is a 90 x 220 pixel 1-bit image
   and it is here represented as ceil (220 / 8) * 90 = 2520 bytes */
unsigned char GMT_glyph[2520]={
0x00, 0x00, 0x00, 0x00, 0x00, 0x00, 0x00, 0x00, 0x00, 0x00, 0x00, 0x00, 0x00, 0x00, 0x00, 0x00,
……
0x00, 0x00, 0x00, 0x00, 0x00, 0x00, 0x00, 0x00, 0x00, 0x00, 0x00, 0x0f, 0x00, 0x00, 0x00, 0x00,
};
其解释表明,GMT 的 logo 是个 dpi=600 的位图,位图像素为 220×90,即 dim[0]=220/600=0.366=> 0.365 inch,dim[1]=90/600=0.15 inch。
位图为 1-bit 图,即黑白图,0 表示白色,1 表示黑色。由于 GMT 的一些内部设置,实际上这里 0 表示黑色,1 表示白色。每个 char 型为 8bit,即一个 char 可以用于存储 8 个像素的信息,比如 0x0f 的二进制表示为 00001111,即表示这 8 个点中,前四个为黑色,后四个为白色。
因而想要修改 GMT 位图的核心是创建一个 GMT_glyph 数组!
PSL_plotcolorimage
PSL_plotcolorimage 的函数声明如下,取自 GMT5.1.0/src/pslib.c :
int PSL_plotcolorimage (struct PSL_CTRL *PSL, double x, double y, double xsize, double ysize, int justify, unsigned char *buffer, int nx, int ny, int nbits);
/* Plots a 24-bit color image in Grayscale, RGB or CMYK mode.
 * When the number of unique colors does not exceed PSL_MAX_COLORS, the routine will index
 * 24-bit RGB images and then attempt to reduce the depth of the indexed image to 1, 2 or 4 bits.
 *
 * x, y     : lower left position of image in plot units
 * xsize, ysize : image size in units (if 0, adjust to keep the original aspect ratio)
 * justify  : indicates what corner x,y refers to (see graphic below)
 * buffer   : contains the bytes for the image
 * nx, ny   : pixel dimension
 * nbits    : number of bits per pixel (1, 2, 4, 8, 24)
 *
 * Special cases:
 * nx <0   : 8- or 24-bit image contains a color mask (first 1 or 3 bytes)
 * nbits <0    :"Hardware" interpolation requested
 *
 *   9       10      11
 *   |----------------|
 *   5    <image>     7
 *   |----------------|
 *   1       2        3
 */
从函数参数的解释中可以看出,nbits 代表了一个像素所需要的位数,nbits 可以取 1、2、4、8、24;buffer 即数组 GMT_glyph;
具体步骤
建立位图文件
直接利用 GIMP 创建位图文件。
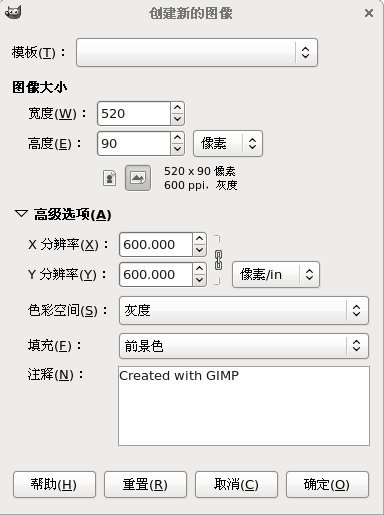
打开 GIMP,“文件 -> 新建”,设置宽度 “520”,高度 “90”,分辨率 “600”,色彩空间为灰色,填充前景色。

输入文件,字体 “STIXGeneral Bold Italic”,大小为 “95”,居中,上下留白 2 像素,左右留白 12 像素;

保存为 Sun Raster 格式,文件名为 raster.im8,提示需要导出,数据格式选择 ** 标准 **。
将 Sun Raster 文件转换为 xbm 格式
xbm 格式类似于 C 语言的格式,也就是 GMT_glyph 数组所需要的。
- 执行
raster2xbm,(代码在这里 下载),将输出保存到gmt_plot.c中的 char 数组GMT_glyph中。 - 将
unsigned char GMT_glyph[2520]改成unsigned char GMT_glyph[46800],其中 46800=520*90; - gmt_timestamp 中
double dim[3] = {0.365, 0.15, 0.032};改成double dim[3] = {0.867, 0.15, 0.032}; - gmt_timestamp 中
PSL_plotcolorimage (PSL, 0.0, 0.0, dim[0], dim[1], PSL_BL, GMT_glyph, 220, 90, 1);改成PSL_plotcolorimage (PSL, 0.0, 0.0, dim[0], dim[1], PSL_BL, GMT_glyph, 520, 90, 8);
重新编译 GMT
修改完代码后,需要重新编译 GMT。理论上,上面所做的改动仅会影响到 - U 选项,而不会影响到其他选项的功能。
一些说明
- 这里改变的 Logo 的宽度而没有改变 Logo 的高度,主要是因为 Logo 与后面的时间戳共用一个高度,修改高度之后可能很多东西都要改,这样比较麻烦;
- GMT 原始的 Logo 为黑白 1-bit 图,精度稍显不够,因而这里使用 8-bit 灰度图;当然也可以使用彩色图;
- GIMP 可以直接保存为 xbm 格式的 1-bit 图,之所以不使用,一方面是因为 1-bit 精度不够,另一方面是 GIMP 保存的 xbm 格式的数据的字节序与本机的字节序不同,导致 Logo 相邻两列或四列的数据相互交换位置。
文章作者 SeisMan
上次更新 2013-11-19